PS1 / PSX Visuals - GD4 Port
An asset by scolastico
Install Asset
Install via Godot
To maintain one source of truth, Godot Asset Library is just a mirror of the old asset library so you can download directly on Godot via the integrated asset library browser
Quick Information

PS1 / PSX Visuals - GD4 Port
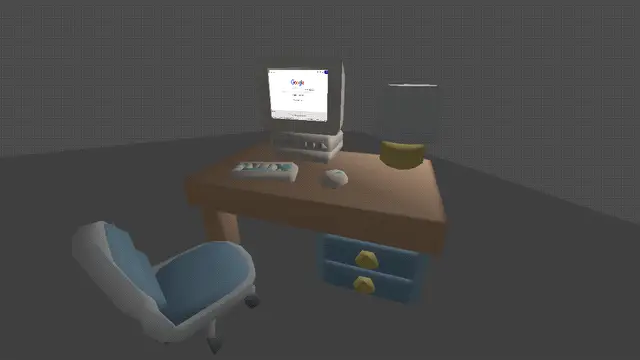
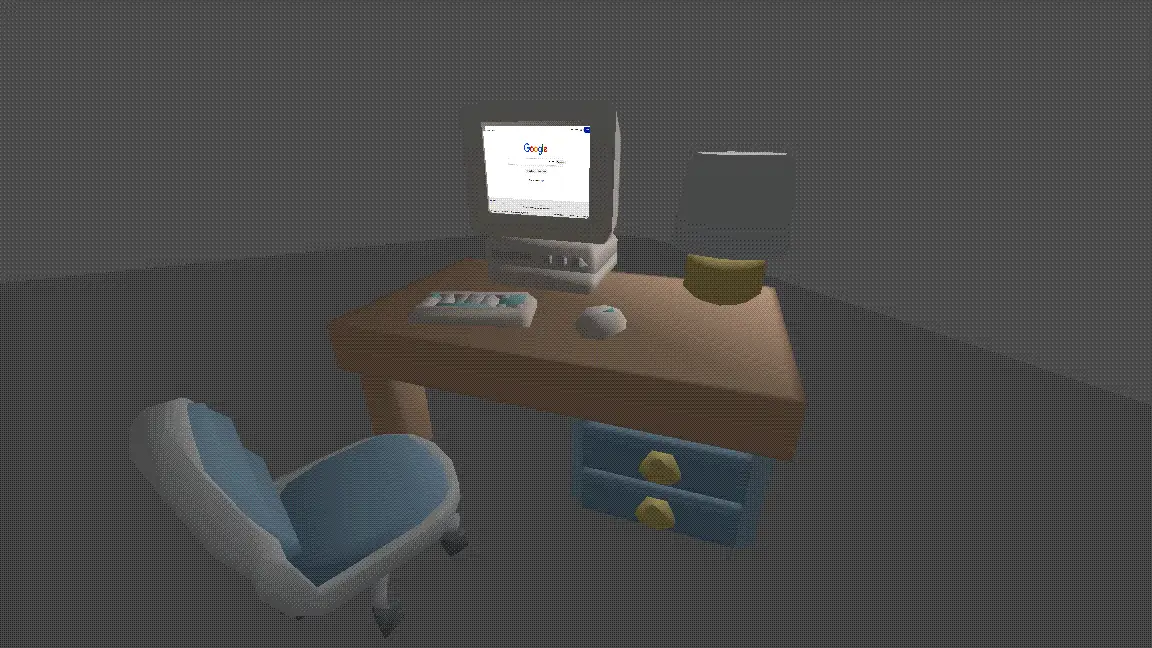
This is a Godot 4 plugin providing a comprehensive suite of shaders and tools to recreate the PlayStation 1 aesthetic. It features vertex snapping, affine texture mapping, distance-based fog, and post-processing dithering managed through Global Shader Uniforms.The plugin includes specialized shaders for opaque, transparent, and double-sided materials, along with two key autoloads: PsxVisualsGd4AutoLoad for screen-space dithering and PsxVisualsGd4AutoApply for automatic runtime material conversion.To install, copy the addons folder to your project and enable the plugin in Project Settings. A setup dialog will appear to initialize Shader Globals and toggle autoloads.Users can apply effects manually using the provided shaders or use the Auto-Apply system which replaces StandardMaterial3D at runtime. For fine-tuned control, right-click any node in the Scene Tree to access the PSX Visuals Settings menu to toggle effects or override material types for specific branches.Global settings like vertex snap distance, affine strength, and fog color are managed under Project Settings > Globals > Shader Globals.When updating, disable the plugin and ensure the cleanup options for Shader Globals and Metadata are unchecked to preserve your project configuration before replacing the addon folder.Full documentation available at:https://github.com/scolastico/psx_visuals_gd4
Supported Engine Version
4.1
Version String
2.1.3
License Version
MIT
Support Level
community
Modified Date
4 months ago
Git URL
Issue URL
PSX Visuals - GD4 Port
This plugin for Godot 4 provides a comprehensive suite of shaders and tools to recreate the iconic aesthetic of the PlayStation 1 (PSX). It includes vertex snapping, affine texture mapping, distance-based fog, and post-processing dithering.
How the Plugin Works
The plugin achieves its look through several key components:
- Shader Global Parameters: The plugin uses Godot's Global Shader Uniforms to manage settings like vertex snap distance, fog, and affine strength across all materials simultaneously.
- Custom Shaders: A set of specialized shaders (
psx_opaque,psx_transparent, etc.) handle the heavy lifting of vertex jittering and texture warping. - Autoloads:
PsxVisualsGd4AutoLoad: Automatically adds aCanvasLayerwith a post-processing ColorRect to apply dithering to the entire screen.PsxVisualsGd4AutoApply: An optional utility that automatically swapsStandardMaterial3Don meshes for the PSX-compatible shaders.
Installation & Setup
- Copy the
addons/psx_visuals_gd4folder into your project'saddonsdirectory. - Go to Project Settings > Plugins and enable PSX Visuals - GD4 Port.
- Upon activation, the plugin will automatically create the necessary Shader Globals in your Project Settings.
- Go to Project Settings > Autoload and enable
PsxVisualsGd4AutoLoad
How to Use
The "Easy Way" (Auto-Apply)
If you want to quickly convert an existing project, ensure both Autoloads are enabled:
- Go to Project Settings > Autoload.
- Ensure
PsxVisualsGd4AutoApplyis active. - This script will automatically detect
GeometryInstance3Dnodes as they enter the scene tree and replace theirStandardMaterial3Dwith the PSX default material, while attempting to preserve your original Albedo and Emission textures.
The Manual Way
Apply the provided materials or create new ones using the PSX shaders:
- Select a
MeshInstance3D. - Create a new
ShaderMaterialand apply it either as the surface material on the mesh or as a material override on theMeshInstance3D(do not use material overlay for this). - Assign one of the shaders from
addons/psx_visuals_gd4/shaders/:psx_opaque.gdshader: For standard solid objects.psx_transparent.gdshader: For objects with transparency.psx_opaque_double.gdshader/psx_transparent_double.gdshader: For double-sided meshes (disables backface culling).
- (Optional) Add an extra material pass using your original material so it renders after the PSX shader, allowing you to combine the PSX effects with your existing look.
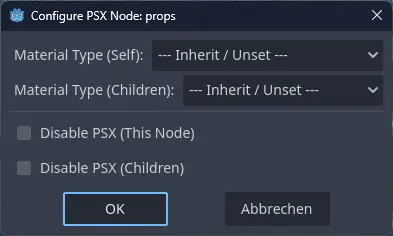
Disabling Auto-Apply on Specific Nodes
If you are using the "Easy Way" but want certain objects to keep their original materials, use Metadata:
- To disable a single node: Add a Metadata entry named
psx_disable(Boolean) and set it totrue. - To disable a whole branch: Add a Metadata entry named
psx_disable_children(Boolean) to a parent node and set it totrue. This prevents the shader from being applied to any of its descendants.
Shader Settings Description
You can find these settings under Project Settings > Shader Globals.
psx_snap_distance: Controls the "vertex jitter." A value of0.025is standard; lower values result in smoother movement, while higher values increase the "shaking" effect.psx_affine_strength: Controls texture warping.1.0provides full PSX-style warping, while0.0is modern perspective-correct mapping.psx_bit_depth: Determines the color depth for the dither effect. Lower values (e.g.,4or5) result in more aggressive banding/dithering.psx_fog_color: The color of the distance fog. The Alpha channel determines the fog's intensity.psx_fog_near/psx_fog_far: The start and end distances for the fog gradient.
License
The original forked repository does not provide an explicit license. However, all changes, porting work for Godot 4, and new code provided in this version are licensed under the MIT License.
This is a Godot 4 plugin providing a comprehensive suite of shaders and tools to recreate the PlayStation 1 aesthetic. It features vertex snapping, affine texture mapping, distance-based fog, and post-processing dithering managed through Global Shader Uniforms.
The plugin includes specialized shaders for opaque, transparent, and double-sided materials, along with two key autoloads: PsxVisualsGd4AutoLoad for screen-space dithering and PsxVisualsGd4AutoApply for automatic runtime material conversion.
To install, copy the addons folder to your project and enable the plugin in Project Settings. A setup dialog will appear to initialize Shader Globals and toggle autoloads.
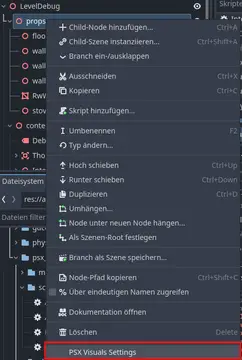
Users can apply effects manually using the provided shaders or use the Auto-Apply system which replaces StandardMaterial3D at runtime. For fine-tuned control, right-click any node in the Scene Tree to access the PSX Visuals Settings menu to toggle effects or override material types for specific branches.
Global settings like vertex snap distance, affine strength, and fog color are managed under Project Settings > Globals > Shader Globals.
When updating, disable the plugin and ensure the cleanup options for Shader Globals and Metadata are unchecked to preserve your project configuration before replacing the addon folder.
Full documentation available at:
https://github.com/scolastico/psx_visuals_gd4
Reviews
Quick Information
PS1 / PSX Visuals - GD4 Port
This is a Godot 4 plugin providing a comprehensive suite of shaders and tools to recreate the PlayStation 1 aesthetic. It features vertex snapping, affine texture mapping, distance-based fog, and post-processing dithering managed through Global Shader Uniforms.The plugin includes specialized shaders for opaque, transparent, and double-sided materials, along with two key autoloads: PsxVisualsGd4AutoLoad for screen-space dithering and PsxVisualsGd4AutoApply for automatic runtime material conversion.To install, copy the addons folder to your project and enable the plugin in Project Settings. A setup dialog will appear to initialize Shader Globals and toggle autoloads.Users can apply effects manually using the provided shaders or use the Auto-Apply system which replaces StandardMaterial3D at runtime. For fine-tuned control, right-click any node in the Scene Tree to access the PSX Visuals Settings menu to toggle effects or override material types for specific branches.Global settings like vertex snap distance, affine strength, and fog color are managed under Project Settings > Globals > Shader Globals.When updating, disable the plugin and ensure the cleanup options for Shader Globals and Metadata are unchecked to preserve your project configuration before replacing the addon folder.Full documentation available at:https://github.com/scolastico/psx_visuals_gd4
Supported Engine Version
4.1
Version String
2.1.3
License Version
MIT
Support Level
community
Modified Date
4 months ago
Git URL
Issue URL