Genesis Engine: AI Game creator
An asset by pranjal
Install Asset
Install via Godot
To maintain one source of truth, Godot Asset Library is just a mirror of the old asset library so you can download directly on Godot via the integrated asset library browser
Quick Information

Genesis Engine: AI Game creator
This tool helps you turn your ideas into game designs and execute them without knowing anything about game design or development. Currently only supports 2d.
Supported Engine Version
4.2
Version String
1.0
License Version
MIT
Support Level
community
Modified Date
3 months ago
Git URL
Issue URL
Genesis Engine
An AI game development assistant for Godot 4.
Describe what you want to build in plain English. It can even be a simple idea or mechanic. Genesis Engine helps you turn them into actual game designs, and then fully execute it, including creating all nodes, scenes, scripts, and even aquiring assets, all inside your Godot editor, without you leaving it.
Status: Early release. Expect rough edges. Please open an issue if something breaks.
What it does
Genesis Engine is a Godot 4 editor plugin that runs a local AI backend (Python + Google Gemini) and connects it to your editor via WebSocket. You chat with it in a dock panel; it acts on your project directly.
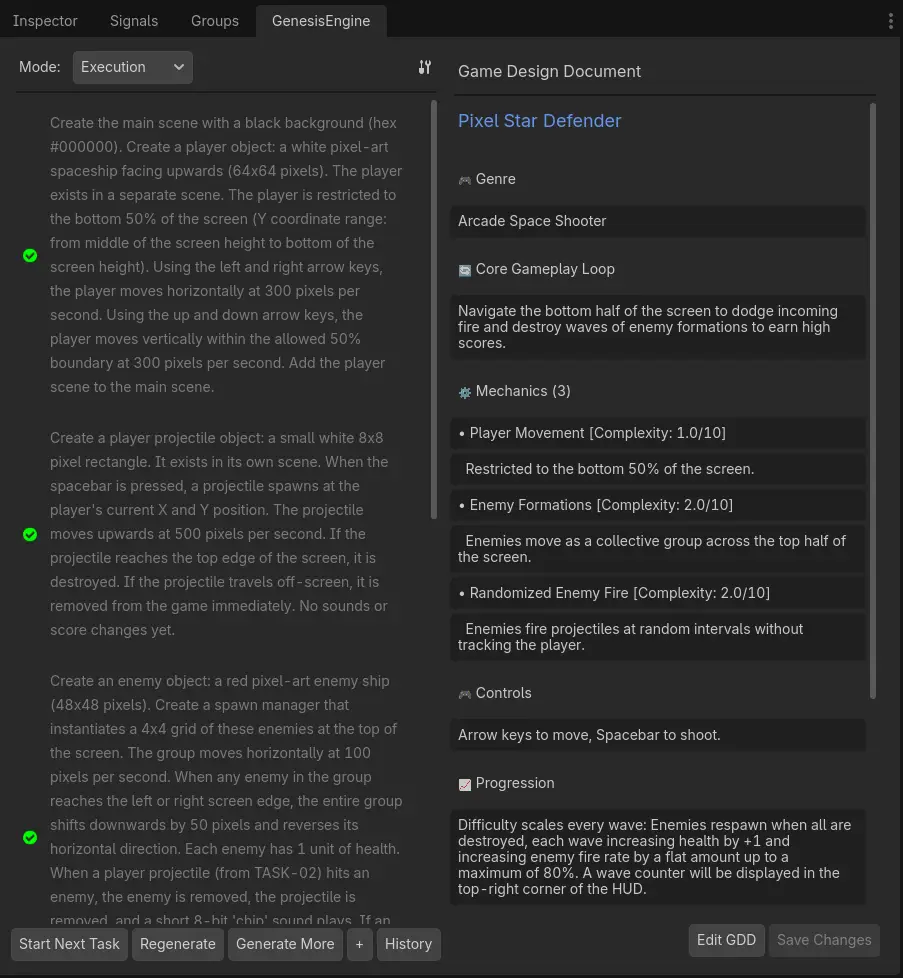
Planning mode — Describe your game idea. The AI produces a Game Design Document and breaks it into a task list.
Execution mode — Run tasks one at a time. For each task the AI:
- Creates and edits
.tscnscene files - Writes and attaches GDScript
- Instances sub-scenes into parent scenes
- Sets the main scene so F5 works immediately
- Generates sprites and audio. (These may not be very good, and you may have to change them yourself. Please check licenses for downloaded images).
Review mode — The AI system can never quite be perfect without user input. This allows you to ask the ai to make bug fixes or tweak the game.
Asset review — Before any generated image or audio is written to your project, a preview dialog lets you approve or regenerate it.
Git integration — Every completed task is committed automatically. You can roll back to any previous task from the History panel.
Requirements
| Requirement | Notes |
|---|---|
| Godot 4.2 or later | |
| Python 3.10 or later | Must be on your PATH or specify the full path in Settings |
| Google Gemini API key | Free tier works — get one at aistudio.google.com |
| Internet connection | For Gemini API calls |
Image generation: By default the plugin uses Gemini's Imagen API for sprites. To generate images locally with Stable Diffusion instead, select Local Diffusers in Settings and install
torch,diffusers,transformers, andaccelerateinto the plugin's.venvseparately. A CUDA-capable GPU is strongly recommended for local generation.
Installation
From the Godot Asset Library
- In the Godot editor, open AssetLib (top centre tab)
- Search for Genesis Engine
- Click Download → Install
- Enable the plugin in Project → Project Settings → Plugins
Manual (from GitHub)
- Download the latest release ZIP from the Releases page
- Extract it — you should get an
addons/genesis_bridge/folder - Copy
addons/genesis_bridge/into your Godot project'saddons/folder - Enable the plugin in Project → Project Settings → Plugins
First-time setup
When you enable the plugin for the first time, a Setup panel appears in the Genesis Engine dock (right side of the editor).
- Enter your Gemini API key — paste the key from aistudio.google.com
- Check the Python path — click Auto-detect or type the path manually
- Click Install & Start Backend
The plugin will create a Python virtual environment inside addons/genesis_bridge/backend/.venv and install all dependencies. This takes a few minutes on first run. A terminal window opens automatically showing the backend logs — you can watch progress there.
Once installation finishes the backend starts and the chat dock becomes active. Setup only runs once; subsequent Godot sessions start the backend automatically.
Usage
Planning a game
- Select Planning mode in the dock
- Describe your game: "A top-down dungeon crawler with a player character, enemies that patrol, and collectible coins"
- Iterate with the AI to create a game design document
- Click Generate Tasks to break the GDD into a numbered task list
- Switch to Execution mode when you're happy with the plan
Running tasks
- Select Execution mode
- Click Start Next Task — the AI works through the task list one step at a time
- A terminal window shows detailed logs as the AI works
- When a task finishes, the editor automatically rescans the filesystem and reloads the open scene
- Approve or regenerate any generated assets when the review dialog appears
- Click Start Next Task again to continue
Reviewing and fixing
- Switch to Review mode at any point to instruct the ai to make specfic bug fixes or tweaks.
- AI will create a plan for the fix. Click Execute Fix to apply it
Rolling back
- Click History in Execution mode to see all committed tasks
- Select any task and click Revert to reset the project to that point
Settings
Click the ⚙ icon in the top-right corner of the Genesis Engine dock to open Settings.
| Setting | Description |
|---|---|
| Gemini API Key | Your key from Google AI Studio. Stored in Godot's editor settings — never written to your project files. |
| Orchestrator model | Gemini model used for planning, reviewing, and coordinating agents. |
| Coder model | Gemini model used for writing GDScript and executing tasks. Can be the same as the orchestrator model. |
| Image provider | Local Diffusers (on-device Stable Diffusion) or Gemini Imagen (cloud API). |
| Daily call limit | The backend pauses task execution once this many API calls have been made in a day. |
| Requests per minute | Rate limit per API key. Increase if you have a paid Gemini tier. |
| Python executable | Path to Python 3.10+. Change this if auto-detect picks the wrong version. |
Changes take effect after clicking Save & Restart Backend.
Troubleshooting
The dock shows "Enter your Gemini API key to get started" after I already set it up
The backend .venv may be missing. Open Settings, confirm your Python path, and click Save & Restart Backend. If the venv is corrupted, delete addons/genesis_bridge/backend/.venv and re-enable the plugin.
The terminal window opens but the backend crashes immediately Check the terminal output for the error. Common causes:
- Invalid or expired Gemini API key
- Python version below 3.10
- A dependency failed to install — try deleting
.venvand reinstalling
Port 8000 is already in use Another process is using the port the backend needs. Find and stop it, then restart the backend via Settings → Save & Restart Backend.
The AI generates scenes but they look empty in the editor Press Ctrl+R to rescan the filesystem. If the scene still looks wrong, check the backend terminal for errors during that task. Note that rate limits aren't always interpretted correctly. Repeated server side erros may break task execution. Please revert to state before task to try again.
Tasks run but no assets are generated
If using Gemini Imagen, confirm your API key has Imagen access enabled (requires a paid tier). If using Local Diffusers, make sure torch and diffusers are installed in the .venv.
Project structure
addons/genesis_bridge/
├── genesis_bridge.gd       # Plugin entry point — manages backend lifecycle
├── bridge_client.gd        # WebSocket client
├── plugin.cfg
├── ui/
│   ├── chat_dock.gd        # Main dock panel
│   ├── setup_panel.gd      # First-run setup UI
│   ├── settings_dialog.gd  # Settings window
│   ├── gdd_panel.gd        # Game Design Document viewer
│   └── task_item.gd        # Task list item
└── backend/                # Python FastAPI backend (auto-started by the plugin)
    ├── start.py            # Launcher — sets sys.path, writes PID file, runs uvicorn
    ├── main.py             # FastAPI app and WebSocket handler
    ├── session.py          # Connection manager
    ├── requirements.txt    # Core Python dependencies
    ├── agents/             # LangGraph multi-agent system
    ├── core/               # LLM client, config, logging, image generation
    ├── models/             # Pydantic data models
    └── services/           # Asset generation, git management, project scanning
License
MIT — see LICENSE.
Built by Pranjal Jain
This tool helps you turn your ideas into game designs and execute them without knowing anything about game design or development. Currently only supports 2d.
Reviews
Quick Information
Genesis Engine: AI Game creator
This tool helps you turn your ideas into game designs and execute them without knowing anything about game design or development. Currently only supports 2d.
Supported Engine Version
4.2
Version String
1.0
License Version
MIT
Support Level
community
Modified Date
3 months ago
Git URL
Issue URL