godot-ui-helpers
An asset by pay-it-forward
Install Asset
Install via Godot
To maintain one source of truth, Godot Asset Library is just a mirror of the old asset library so you can download directly on Godot via the integrated asset library browser

Quick Information

godot-ui-helpers
A simple C# script that will help you create many cool UI elements.QUICK START:1. After importing the asset, if you do not already have a C# Solution you can create one under `Project -> Tools -> C# -> Create C# Solution`.2. Then click `Build` which will build the .Net Project.3. Load one of the sample scenes under `addons/godot-ui-helpers/scenes`and run it.4. Change the `distance` variable in the inspector and other settings to see the effects.
Supported Engine Version
4.1
Version String
1.1.0
License Version
CC0
Support Level
community
Modified Date
2 years ago
Git URL
Issue URL
Sprite2D UI Component using Godot and C#
This is a guide to use a C# script in Godot for creating dynamic UI components using 2D Sprites.

Quick Start
After importing the asset, if you do not already have a C# Solution you can create one under
Project -> Tools -> C# -> Create C# Solution.Then click
Buildwhich will build the .Net Project.Load one of the sample scenes under
addons/godot-ui-helpers/scenesand run it.Change the
distancevariable in the inspector and other settings to see the effects.
Sample Scenes
It's a good idea to look at the sample scenes to get a feel for how the script works.
In the /scene directory, you'll find sample scenes that show different usage scenarios for the script. You can use these as starting points or references for your own use cases.
Please run these scenes and experiment with changing the distance variable inside the inspector on runtime, so you can see how they affect the present UI elements. Inside the inspector, by manipulating the properties of the script, you are able to see the immediate changes in the scene.
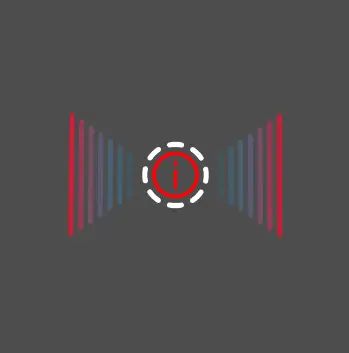
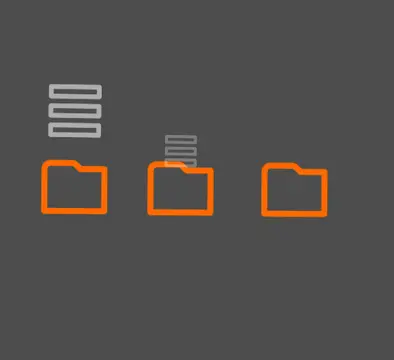
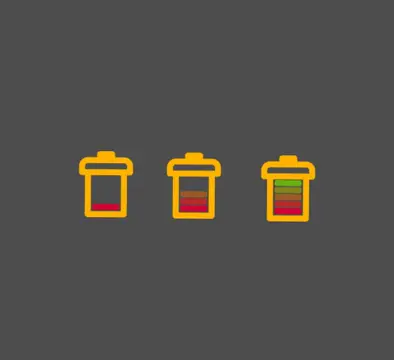
| Battery Sample | Signal Sample | Folder Sample |
|---|---|---|
/scenes/battery-sample.tscn |
/scenes/signal-sample.tscn |
/scenes/folder-sample.tscn |
 |
 |
 |
| Progress Sample | Hydrogen Sample |
|---|---|
/scenes/progress-sample.tscn |
/scenes/hydrogen-sample.tscn |
 |
 |
How to Use
To use this script, you follow these steps:
Attach the
sprite2d_uiC# script to a Node2D object in your scene.Set the Texture for base, pip and end as needed. You can use the provided sample textures or create your own.
All configurations for the UI component are in Godot's Inspector. You can tweak many visual and behavioral properties for example colors, textures, position, rotation, and scaling of the sprite UI elements and even how they will change over distance.
The real power of this script lies in its
distanceproperty. By varying it from 0 to 100, you will create a wide array of effects. For example, a progress bar that fills up, or an element that slides or snaps into place.With the
Modedropdown, you can control how the player sees the change indistance. It can eitherFill, where each pip is rendered with an offset of_pipSpacingorSnap, where elements snap from 0 to 100 instantly in their respective position with only one pip visible at a time, orSlide, where the pip smoothly slides from 0 to 100.A mirror feature is available with the
_mirrorflag. If set to true, it generates a mirrored component around the Y axis which can then be further fine tuned in the inspector.The
minPipsandmaxPipsvariables control the number of elements ("pips") visible at the minimum and maximum distance, respectively.If you want to include an optional sprite at the end of your sequence, you can use the
_endsprite and its related settings.
A simple C# script that will help you create many cool UI elements.
QUICK START:
1. After importing the asset, if you do not already have a C# Solution you can create one under `Project -> Tools -> C# -> Create C# Solution`.
2. Then click `Build` which will build the .Net Project.
3. Load one of the sample scenes under `addons/godot-ui-helpers/scenes`and run it.
4. Change the `distance` variable in the inspector and other settings to see the effects.
Reviews
Quick Information
godot-ui-helpers
A simple C# script that will help you create many cool UI elements.QUICK START:1. After importing the asset, if you do not already have a C# Solution you can create one under `Project -> Tools -> C# -> Create C# Solution`.2. Then click `Build` which will build the .Net Project.3. Load one of the sample scenes under `addons/godot-ui-helpers/scenes`and run it.4. Change the `distance` variable in the inspector and other settings to see the effects.
Supported Engine Version
4.1
Version String
1.1.0
License Version
CC0
Support Level
community
Modified Date
2 years ago
Git URL
Issue URL