dynamic-2d-grass
An asset by jomoho
Install Asset
Install via Godot
To maintain one source of truth, Godot Asset Library is just a mirror of the old asset library so you can download directly on Godot via the integrated asset library browser

Quick Information

dynamic-2d-grass
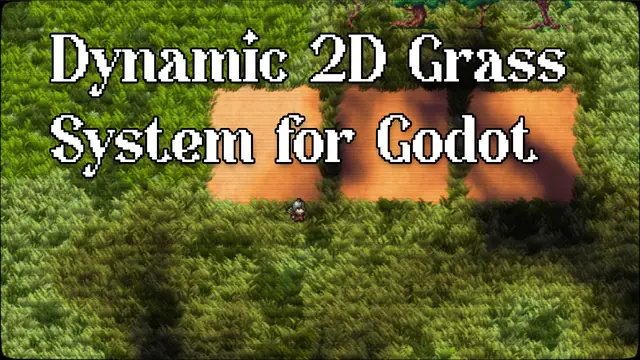
A stylised 2D pixel-art grass system for Godot 4.5+, featuring wind animation, character-reactive displacement, grass destruction via effector decals, and world-space cloud shadows.Demo:https://jomoho.itch.io/dynamic-2d-grass
Supported Engine Version
4.5
Version String
1.0.0
License Version
MIT
Support Level
community
Modified Date
3 months ago
Git URL
Issue URL
Dynamic 2D Grass
A stylised 2D pixel-art grass system for Godot 4.5+, featuring wind animation, character-reactive displacement, grass destruction via effector decals, and world-space cloud shadows.
Created by Jomoho Games, based on original work by Dylearn.
Features
- Camera-adaptive grass streaming (handles large tilemaps efficiently)
- Per-instance wind sway via dual scrolling noise textures
- Stepped framerate animation with per-blade phase offset
- Fake perspective UV squishing
- Noise-based colour patches and accent grass variants
- Character-reactive displacement via effector system
- Grass destruction and regrowth via effector decals
- Full-scene cloud shadow overlay with pseudo-3D offset
- TileMapLayer integration with automatic grass placement
- All parameters exposed as
@exportproperties in the inspector
Installation
From the Godot Asset Library
- Open your project in Godot 4.5+
- Go to AssetLib tab
- Search for Dynamic 2D Grass
- Click Download and Install
- Enable the plugin: Project > Project Settings > Plugins > Dynamic 2D Grass
Manual Installation
- Download or clone this repository
- Copy the
addons/dynamic_2d_grass/folder into your project'saddons/directory - Enable the plugin: Project > Project Settings > Plugins > Dynamic 2D Grass
Quick Start
1. Set up your TileMapLayer
Create a TileMapLayer node with your ground tiles. The grass system reads this to decide where grass grows.
Add a custom data layer to mark grass tiles:
- Select your TileSet resource
- Go to Custom Data Layers in the TileSet inspector
- Add a layer named
is_grasswith type bool - Open the TileSet editor, select tiles that should have grass
- In each tile's Custom Data panel, set
is_grass = true
Only tiles marked with is_grass = true will generate grass blades.
Add a navigation polygon layer (optional):
For per-tile grass coverage shapes (e.g. sloped edges, partial coverage), you can use navigation polygons to define the exact grass boundary:
- Add a Navigation Layer to your TileSet
- Draw navigation polygons on individual tiles in the TileSet editor — these define the area where grass can grow within that tile
- Set the
grass_nav_layerexport on bothGrassChunkManager2DandGrassEffectManager2Dto match the navigation layer index you used
If no navigation polygon is set on a tile, the full tile area is used.
2. Add GrassChunkManager2D
Add a GrassChunkManager2D node (from addons/dynamic_2d_grass/scripts/GrassChunkManager2D.gd) to your scene and configure:
| Property | Description |
|---|---|
tile_map |
Reference to your TileMapLayer (auto-detected if a child named "TileMapLayer" exists) |
density |
Grass blades per tile (default: 6) |
grass_sprite_size |
Size of each grass blade in pixels |
grass_material |
Assign the included grass_2d_material.tres |
grass_texture |
Sprite atlas for grass blades |
grass_nav_layer |
Navigation layer index for per-tile coverage shapes (default: 0) |
3. Add GrassEffectManager2D
Add a GrassEffectManager2D node and configure:
| Property | Description |
|---|---|
chunk_manager |
Reference to your GrassChunkManager2D |
camera |
Reference to your Camera2D |
viewport_scale |
Resolution scale for the terrain data texture |
grass_nav_layer |
Must match the value set on GrassChunkManager2D |
4. Add effectors
To make objects interact with grass, add GrassEffector2D as a child of any Node2D:
- Set a texture for the effect shape
- Choose
target_channel: R (displacement), G (coverage), B (cloud Y-offset), A (cloud immunity) - Choose
blend_operation: ADD (accumulate) or SUB (erase)
5. Add cloud shadows (optional)
Add a CanvasLayer with a ColorRect child. Attach CloudOverlay2D.gd to the ColorRect and assign:
- The included
cloud_overlay_material.tresas the material - References to your camera and effect manager
6. Add a CRT post-process shader (recommended)
The pixel-art grass looks best with a CRT or retro post-processing shader on top. The example project includes the Flowerwall CRT shader for this purpose. Any CRT/scanline shader will work — it helps blend the pixel-art aesthetic and hides sub-pixel seams.
Example Scene
An example scene is included in example/scenes/Demo2D.tscn. Open it to see the full system in action with a tilemap, grass, effectors, bombs, and cloud shadows.
The example/ directory is optional and can be safely deleted without affecting the addon.
Addon Structure
addons/dynamic_2d_grass/
  scripts/      GDScript components
  shaders/      Grass, cloud, effector, and mask shaders
  materials/    Pre-configured ShaderMaterials
  textures/     Default grass sprite atlas
  noise/        Noise resources for wind, clouds, and colour patches
License
This project uses two licences:
- Code (scripts, shaders): MIT License -- Jomoho Games, based on original work by Dylearn
- Art assets (textures, visual content): CC BY 4.0
Third-Party Assets
- Grass art: Dylearn
- Tree sprites: GraphScriptDev
- Character sprites: Zerie
A stylised 2D pixel-art grass system for Godot 4.5+, featuring wind animation, character-reactive displacement, grass destruction via effector decals, and world-space cloud shadows.
Demo:
https://jomoho.itch.io/dynamic-2d-grass
Reviews
Quick Information
dynamic-2d-grass
A stylised 2D pixel-art grass system for Godot 4.5+, featuring wind animation, character-reactive displacement, grass destruction via effector decals, and world-space cloud shadows.Demo:https://jomoho.itch.io/dynamic-2d-grass
Supported Engine Version
4.5
Version String
1.0.0
License Version
MIT
Support Level
community
Modified Date
3 months ago
Git URL
Issue URL