Weather 2D
An asset by pirachute
Install Asset
Install via Godot
To maintain one source of truth, Godot Asset Library is just a mirror of the old asset library so you can download directly on Godot via the integrated asset library browser
Quick Information

Weather 2D
An easy to use 2D Weather for Godot games including wind, rain, snow and some scene darkening...INCLUDES:1. An easy to configure weather node to place in your scene.2. A "weather collider" node to place in your game so weather changes when player enters in a specific area3. Samples scene including a graphic UI to test different weather variables.FEATURES:- Simple to configure- Follows the player (or another node)- Rain and Snow textures and be easily changed
Supported Engine Version
3.2
Version String
1.0
License Version
MIT
Support Level
community
Modified Date
5 years ago
Git URL
Issue URL
godot-weather-2D
An easy to use 2D Weather for Godot games including wind, rain, snow and some scene darkening...
HOW TO USE ----------------------
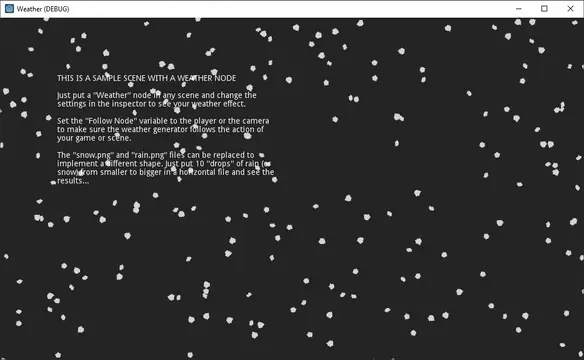
WEATHER NODE: Just put a "Weather" node in any scene and change the settings in the inspector to see your weather effect.
FOLLOW NODE (Property): Set the "Follow Node" property to the player or the camera to make sure the weather generator follows the action of your game or scene.
WHAT CAN I CHANGE? -------------
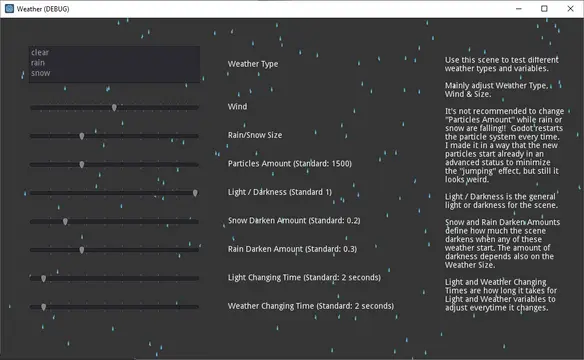
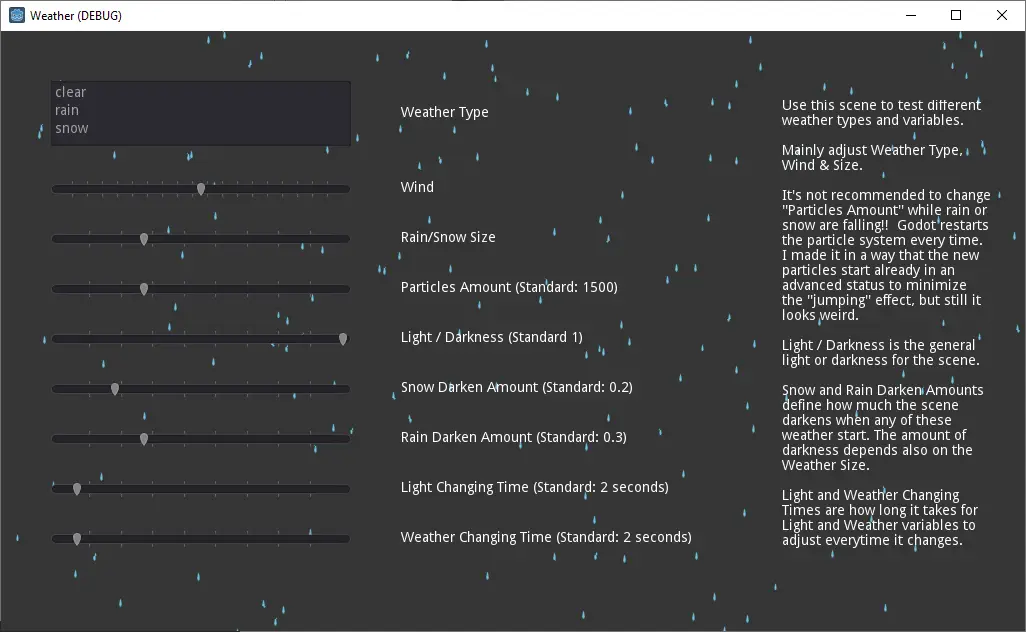
WEATHER TYPE (weatherType): clear, rain, snow
WIND (wind) (-1 to 1): Sets the stregth and direction of the wind. 1 is wind to the right and -1 is to the left.
SIZE (size) (0.1 to 1): Sets the size of the rain / snow. Technically, it selects which "frames" to use from the rain.png and snow.png files as textures
PARTICLES AMOUNT (amount): The "Amount" property changes the amount of particles in the screen. You should set this BEFORE activating the weather.
It's not recommended to change "Particles Amount" while rain or snow are falling!! Godot restarts the particle system every time you change this. I made it in a way that the new particles start already in an advanced status to minimize the "jumping" effect, but still it looks weird.
LIGHT (light)[0 to 1]: Light is the general light or darkness of the scene. Can be useful to simulate day and night
SNOW DARKNESS (snow_darkness)(0 to 1): Defines how much the scene darkens when it starts to snow. The amount of darkness depends also on the Weather Size. Bigger snow, the scene darkens more.
RAIN DARKNESS (rain_darkness)(0 to 1): Defines how much the scene darkens when it starts to rain. The amount of darkness depends also on the Weather Size. Bigger rain, the scene darkens more.
LIGHT CHANGE TIME (lightChangeTime) (in seconds) How long it takes for light to adjust everytime it changes.
DELAY WEATHER CHANGE (delayWeatherChange) (true / false): Waits for light change to start changing weather. It can be usuful to give a "Warning" to the player that the weather is about to change...
WEATHER CHANGE TIME(weatherChangeTime) (in seconds) How long it takes for weather (size and wind) to adjust everytime it changes.
NIGHT COLOR (nightColor) (it's a color!): It's a layer that "subtracts" a color to the scene to create the effect of darkness. The standard is white (so the scene gets black)... Feel free to experiment with this for other effects.
FOLLOW NODE (followNode) (path to the node to follow): Set the "Follow Node" property to the player or the camera to make sure the weather generator follows the action of your game or scene.
CHANGING THE RAIN AND SNOW TEXTURES: ----------
Replace "snow.png" and "rain.png" files to implement a different shape. Just put 10 "drops" of rain (or snow) from smaller to bigger in a horizontal file and see the results.
NOTE: You can use bigger or smaller resolution files as long as it's 10 horizontal frames.
IT WORKS GREAT FOR PIXEL ART!!
WEATHER COLLIDER --------------
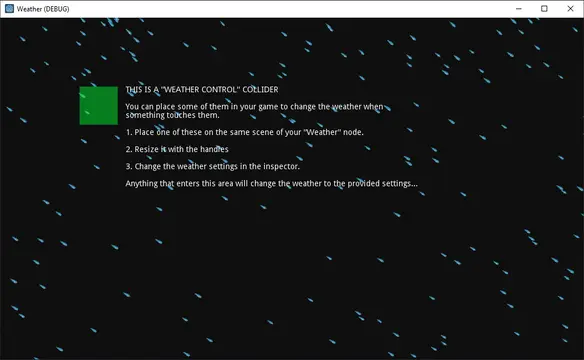
The "Weather Collider" is made so you can easily manage the weather changes in your game when the player "touches" certain areas.
HOW IT WORKS:
Place one of these on the same scene of your "Weather" node.
Resize it with the handles
Change the weather settings in the inspector.
Anything that enters this area will change the weather to the provided settings...
CONTROLLING FROM CODE ---------
Make a reference to the "Weather" node in your program
Change one ore more properties of the "Weather".
Call the change_weather() method
EXAMPLE CODE:
# Weather Reference
onready var weather: Node2D = get_node(weatherNode)

# Change Properties
weather.size = value
weather.change_weather()

# Applyc Changes
weather.change_weather()
An easy to use 2D Weather for Godot games including wind, rain, snow and some scene darkening...
INCLUDES:
1. An easy to configure weather node to place in your scene.
2. A "weather collider" node to place in your game so weather changes when player enters in a specific area
3. Samples scene including a graphic UI to test different weather variables.
FEATURES:
- Simple to configure
- Follows the player (or another node)
- Rain and Snow textures and be easily changed
Reviews
Quick Information
Weather 2D
An easy to use 2D Weather for Godot games including wind, rain, snow and some scene darkening...INCLUDES:1. An easy to configure weather node to place in your scene.2. A "weather collider" node to place in your game so weather changes when player enters in a specific area3. Samples scene including a graphic UI to test different weather variables.FEATURES:- Simple to configure- Follows the player (or another node)- Rain and Snow textures and be easily changed
Supported Engine Version
3.2
Version String
1.0
License Version
MIT
Support Level
community
Modified Date
5 years ago
Git URL
Issue URL