TalkieTalkie
An asset by Substain
Install Asset
Install via Godot
To maintain one source of truth, Godot Asset Library is just a mirror of the old asset library so you can download directly on Godot via the integrated asset library browser

Quick Information

TalkieTalkie
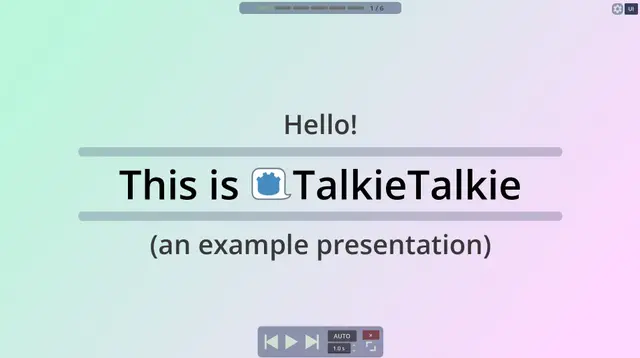
An addon for creating and displaying interactive presentations within Godot. An example presentation can be found here: https://substain.itch.io/talkietalkie
Supported Engine Version
4.6
Version String
0.0.92
License Version
MIT
Support Level
community
Modified Date
2 days ago
Git URL
Issue URL
TalkieTalkie
Check out the TalkieTalkie itch page for a live build of the example presentation.
Disclaimer: To use this addon, you need a basic understanding of Godot, since the presentations are built in the engine and exported as builds. Especially if you want to create more customized slides/presentations, you may need to familiarise yourself with the inner workings of this addon. In any case, feel free to open an issue or ask a question.
Overview
Installation
- Install the addon via the Asset Library (recommended) or manually:
- Asset Library: with your project opened in Godot, open the
AssetLibTab, search for TalkieTalkie, Download and Install - manually: download the latest release from Github, unpack it, and copy the
addons/talkietalkiefolder to theaddonsfolder in your project.
- Enable the addon via
Project Settings->Plugins. This will prompt you to restart the Godot Editor (to reload the Input Map)
Note: This template is being developed in the latest version of Godot and has been tested with 4.5+. Using a Godot 4.4 is currently possible with some modifications to the SideWindow, earlier versions require further changes to the code base.
Examples
You can find the example presentation at /demo/example_base/example_base_presentation.tscn and /demo/example_2d/example_2d_presentation.tscn.
All files in /demo/example* are mainly used for reference purposes and can safely be deleted, if necessary.
Quickstart
While you can manually create presentations manually, using the presentation generator is recommended. Even if you create a presentation manually, feel free to have a look at presentation_generator.gd, as it also serves as a configuration example.
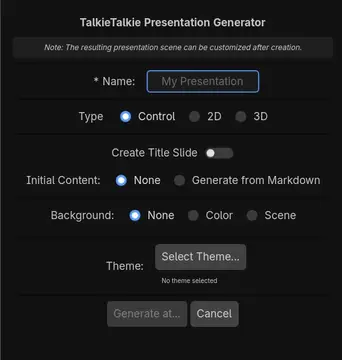
Via Generator
You can create presentations easily via the presentation generator, which can be found at Project -> Tools -> TalkieTalkie: Generate Presentation (if the plugin is active). This will prompt you with a popup where you can specify the name, type (Control, 2D or 3D), content, background and theme of the presentation. Most options should be self-explanatory. Everything can be customized after creation, the content generation via markdown can also be done later using the SlideGenerator.
Note: Using the 2D or 3D type option currently only have an impact on the layout of the slides. You can have a control type presentation and use a 2D background, if you want to. Also note that 3D presentations have not really been tested so far.
Manually
The following steps are intended to provide a quick introduction to creating a new presentation with this framework.
- Create an inherited scene from
/engine/base/presentation.tscn. Using a dedicated folder for your presentation and its assets may be helpful. - Create the slides and add them to your presentation scene.
- The fastest way to set up a slide or a template is to use/modify a slide from the examples, e.g.
/demo/example_base/template/example_*.tscn - You can use the SlideGenerator to quickly create multiple text slides from markdown-like text and a template slide
- The fastest way to set up a slide or a template is to use/modify a slide from the examples, e.g.
- Optional: add a custom background as child of the Background node
- Optional: Edit the exported properties in the Presentation & UI nodes and/or update the input actions according to your preferences
Keybindings
These are the default keybindings that are added when the plugin is activated. These can be configured via Godot's input action map
Continue Slide (
tt_continue) - Right Arrow Key / Down Arrow Key / Space / Left ClickPrevious Slide (
tt_back) - Left Arrow Key / Up Arrow Key / Page Up / Mouse Wheel UpSkip Slide (
tt_skip_slide) - Page Down / Mouse Wheel DownShow/Hide UI (
tt_toggle_ui) - F1 / Tab / Right ClickRestore/Center Side Window (
tt_restore_side_window) - F11Fullscreen (
tt_fullscreen) - F12Quit (
tt_quit) - EscapeDraw with DrawPointer 1 (
tt_draw_pointer_1) - Ctrl (Hold) + any mouse button (Hold)Draw with DrawPointer 2 (
tt_draw_pointer_2) - Alt (Hold) + any mouse button (Hold)Movement for the 2D example (
tt_move_*) - W, A, S, D
Note: Unhandled left click input events trigger a slide continue as well. You can modify this behavior by setting the CONTINUE_ON_UNHANDLED_LEFT_CLICK variable in tt_setup.gd to false.
Components
This section aims to provide a basic documentation of the components.
PresentationNote that this project is currently rather in a prototype status and some functionality may be reworked in the future.
The Presentation, Presentation2D and Presentation3D nodes are used for a basic setup and act as a glue for UI and the controller. They also contain properties for configuring the overall presentation, such as the default transition between slides. Slides below this nodes receive an index based on their order in the tree (unless a custom order is used).
The presentation nodes usually have a SlideController child, which handles the state of the presentation, i.e. changing slides, playing animations, and jumping between slides.
Slide
A slide is the main building block of a presentation in TalkieTalkie. Currently, only the AnimSlide implementation is used in the examples, which seems to cover the basic use cases. AnimSlides collect all SlideAnimation nodes in its children and start them based on their ordering according to their sortorder (or top-down if no sortorder is provided).
SlideAnimation
These nodes define how a slide is progressed and how changes within a slide are animated. The targetNodes property specifies which nodes are affected by the animation. If this property is empty, the SlideAnimation's parent node will be used as the target for the animation.
TTSlideHelper and SlideContext
TTSlideHelper is an autoload used for globally accessing the current state and main components of the presentation. It provides access to the SlideContext which holds context-specific information such as the Camera2D in 2D presentations.
UI
The UI contains the following components:
A Control Bar used for navigation, starting an automatic slideshow, and shortcuts to fullscreen and closing the presentation
The Tab Navigation Bar are a quick way to see the current progress and navigate between slides. At the moment, this is mainly useful for presentations with fewer slides, because no further grouping of slides or scrolling is done.
An Settings menu that contain language and audio options
Note that if the side window is active, the UI will show up there.
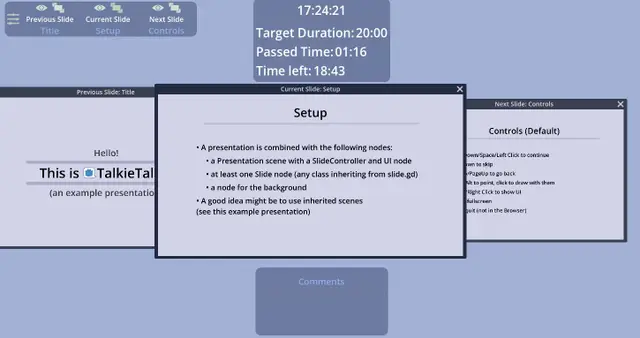
Side-Window
An optional window showing presentation infos. You can configure the basic behavior of this via the SideWindowBase node, which is part of the presentation. In this window, previews for the last, current, and next slides can be displayed. Also, the side window shows time informations and slide comments as well as the UI, if active.
Note that currently, slide previews are created by packing them into packed scenes when starting a presentation. This may lead to an error message with signals on packed scenes inside these slides:
load_slide_by_packed_scene(): Signal x is already connected to given callable y in that object.
You can make the packed scene local inside the slide to avoid this error. It also seems like you can safely ignore this error.
The layout of this window (size, position, and preview layouts) is saved in the preferences and loaded on startup.
DrawPointer
This Node is currently located within the UI and adds the possibility to draw onto the slides. Holding a button (Default: Ctrl and Alt) will show an icon, and pressing the left mouse button lets you draw onto the slides. Drawings are removed after some seconds have passed or the slide is changed.
There are some configuration options exposed via all_draw_properties on that node.
SlideGenerator
With the SlideGenerator, you can generate slides from markdown-like text. This tool script can be attached to any node, and will generate Slides based on the text provided via the input_text property. The format is based on Markdown-Syntax, although not all functionality is implemented currently.
- For each header (lines beginning with e.g. #, ##, ###, ...), a slide is generated based on the
slide_scene. - The
content_scenewill be used for the nodes created for the content (which is everything below the header, except for comments). - Comments are, by default, created from lines that begin with // , [//] or [comment]. This behavior can be edited with the 'comment_line_regex'
- With
slide_title_path, you can specify the path in the template scene that represents the title of the slide whereasslide_content_parent_pathspecifies under which node the content scene(s) are placed as children. - Besides not creating duplicated slides with the same title via
ignore_if_slide_name_existsyou can also choose toreplace_existing_instatiated_slides(dangerous!)
Hit Generate Slides to generate the slides.
Planned Features
Here is an incomplete list of features you can hope to see in the future:
- A searchable table of contents (UI) that that provides improved slide navigation
- A better integration for Game Showcases
- Workflow improvements for creating slides (translations, images, markdown)
- An example scene for 3D presentations
- Theming, UI/UX and mobile improvements
Screenshots
License
MIT License (see LICENSE.md)
An addon for creating and displaying interactive presentations within Godot.
An example presentation can be found here: https://substain.itch.io/talkietalkie
Reviews
Quick Information
TalkieTalkie
An addon for creating and displaying interactive presentations within Godot. An example presentation can be found here: https://substain.itch.io/talkietalkie
Supported Engine Version
4.6
Version String
0.0.92
License Version
MIT
Support Level
community
Modified Date
2 days ago
Git URL
Issue URL