Simple Online Multiplayer Networking Authoritative Dedicated Server
An asset by Linko
Install Asset
Install via Godot
To maintain one source of truth, Godot Asset Library is just a mirror of the old asset library so you can download directly on Godot via the integrated asset library browser
Quick Information


Simple Online Multiplayer Networking Authoritative Dedicated Server
# Simple Online Multiplayer Networking Authoritative Dedicated ServerA simple Godot multiplayer setup. Change the IP address to your cloud service public DNS, then compile and upload it as a Linux headless version with debug. The clients will connect automatically to the server. The server has full authority; players can only send inputs in order to prevent cheating. The server is the only one able to see the players’ inputs. The server selects a random map, then selects a random node in the spawn area group, obtains its dimensions, and sets a random position for the client spawned inside it.## Tutorial to host the game online* Create an Amazon Web Services account, then sign in to the console. At the top right, set the region to where you want to create the server (ideally East United States or West Europe).* Create an EC2 instance. Create a key pair, name it for example **mykey**, and save it in a folder that you call **security**. Beside the checkbox **Allow SSH traffic from**, set the option to **My IP**. Click **Launch instance**.* Go to your instance. Click the **Security** tab. Open the **Security groups** link. Click **Edit inbound rules**. Click **Add rule**, set the type to **Custom UDP**, and for the port range use the port of your game (in this demonstration project it is 8080). For the source, select **Anywhere IPv4**. Click **Save rules**.* In your instance, copy the full Public DNS address to your game script for the constant `SERVER_IP`. Important: each time you stop the instance and then start it again the Public DNS will change, and you will need to rebuild your game.* Export a Linux build of your game. In the **Resources** tab, set the **Export mode** to **Export as dedicated server**. Export it and check **Export With Debug** in order to obtain a `.sh` file. This is the file the cloud server will run. Use a simple name such as **server** and save your project in a folder called **server**.Open the console. Go to the folder where you saved your key, for example (use right click to paste in the console):```bashcd "C:\Users\USERNAME\Desktop\security"```Then type this to connect to your instance:```bashssh -i mykey.pem ec2-user@PUBLIC_DNS_HERE```If it asks for the fingerprint, type **yes**. Then type it again to connect; you should see a bird displayed.Before uploading your server file, make sure that you have pasted the Public DNS of your instance for the SERVER_IP constant in your game. If you want to upload a new version, delete the previous folder in your instance first using this command: `rm -rf ~/server`. To upload the files, you must not be connected to the instance. Open a new console and type this, using the path to your key and the path to your server folder.```bashscp -i "C:\Users\USERNAME\Desktop\security\mykey.pem" -r "C:\Users\USERNAME\Desktop\server" ec2-user@PUBLIC_DNS_HERE:~/server```Go back to the previous console where you are connected or use the previous command to connect again:```bashssh -i mykey.pem ec2-user@PUBLIC_DNS_HERE```You can type **ls** to see whether the folder has been uploaded correctly.Set the correct permissions for the files:```bashchmod -R +x server```Launch the server with this command:```bash./server/server.sh```**Make it persistent**To make it persistent and make it always run even if you close the terminal or shut down your computer you must install tmux while being connected to your EC2 instance.To install tmux:```bashsudo yum install tmux -y```Launch tmux and give the session a name:```bashtmux new -s godotserver```Do the same command as before to launch the server:```bash./server/server.sh```You can now close the console or shut down your computer, and your server will still be running.To disconnect your server, go back to your tmux session if you had left it by typing this:```bashtmux attach -t godotserver```Then press **Ctrl + C** to disconnect the server.
Supported Engine Version
4.5
Version String
1.0
License Version
MIT
Support Level
community
Modified Date
19 hours ago
Git URL
Issue URL
Godot Simple Networking
A simple networking base template you can use in your Godot project. It allows to connect to a local server, spawn players from different spawn locations, update the position of each player and share their username and it has a simple chat system that also displays who has connected.
Every script is minimalist to allow you to understand easily how they work and to improve them.
In the Map scene add a Spawners node and one or more Spawn node as a child to set different locations. Network.gd will randomly pick one of the spawn.
YouTube video: https://youtu.be/cp9YBU-iFBs
# Simple Online Multiplayer Networking Authoritative Dedicated Server
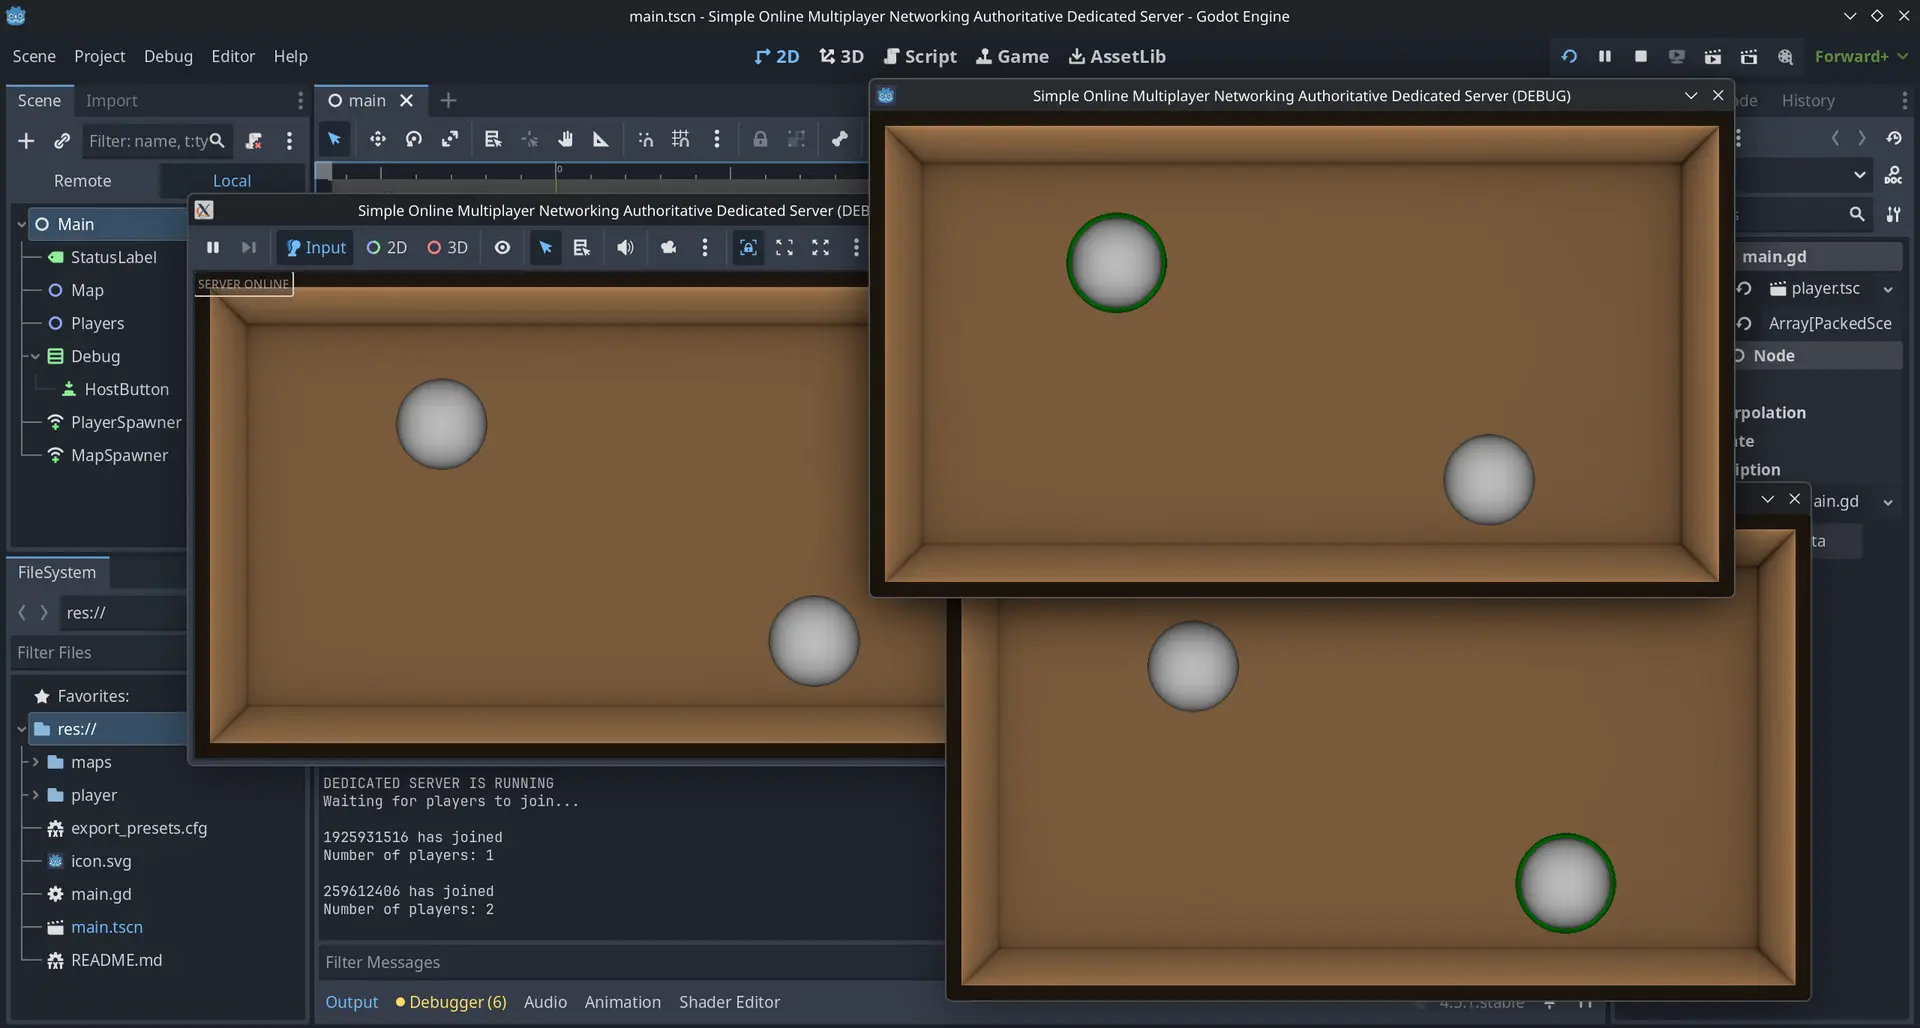
A simple Godot multiplayer setup. Change the IP address to your cloud service public DNS, then compile and upload it as a Linux headless version with debug. The clients will connect automatically to the server. The server has full authority; players can only send inputs in order to prevent cheating. The server is the only one able to see the players’ inputs. The server selects a random map, then selects a random node in the spawn area group, obtains its dimensions, and sets a random position for the client spawned inside it.
## Tutorial to host the game online
* Create an Amazon Web Services account, then sign in to the console. At the top right, set the region to where you want to create the server (ideally East United States or West Europe).
* Create an EC2 instance. Create a key pair, name it for example **mykey**, and save it in a folder that you call **security**. Beside the checkbox **Allow SSH traffic from**, set the option to **My IP**. Click **Launch instance**.
* Go to your instance. Click the **Security** tab. Open the **Security groups** link. Click **Edit inbound rules**. Click **Add rule**, set the type to **Custom UDP**, and for the port range use the port of your game (in this demonstration project it is 8080). For the source, select **Anywhere IPv4**. Click **Save rules**.
* In your instance, copy the full Public DNS address to your game script for the constant `SERVER_IP`. Important: each time you stop the instance and then start it again the Public DNS will change, and you will need to rebuild your game.
* Export a Linux build of your game. In the **Resources** tab, set the **Export mode** to **Export as dedicated server**. Export it and check **Export With Debug** in order to obtain a `.sh` file. This is the file the cloud server will run. Use a simple name such as **server** and save your project in a folder called **server**.
Open the console. Go to the folder where you saved your key, for example (use right click to paste in the console):
```bash
cd "C:\Users\USERNAME\Desktop\security"
```
Then type this to connect to your instance:
```bash
ssh -i mykey.pem ec2-user@PUBLIC_DNS_HERE
```
If it asks for the fingerprint, type **yes**. Then type it again to connect; you should see a bird displayed.
Before uploading your server file, make sure that you have pasted the Public DNS of your instance for the SERVER_IP constant in your game. If you want to upload a new version, delete the previous folder in your instance first using this command: `rm -rf ~/server`. To upload the files, you must not be connected to the instance. Open a new console and type this, using the path to your key and the path to your server folder.
```bash
scp -i "C:\Users\USERNAME\Desktop\security\mykey.pem" -r "C:\Users\USERNAME\Desktop\server" ec2-user@PUBLIC_DNS_HERE:~/server
```
Go back to the previous console where you are connected or use the previous command to connect again:
```bash
ssh -i mykey.pem ec2-user@PUBLIC_DNS_HERE
```
You can type **ls** to see whether the folder has been uploaded correctly.
Set the correct permissions for the files:
```bash
chmod -R +x server
```
Launch the server with this command:
```bash
./server/server.sh
```
**Make it persistent**
To make it persistent and make it always run even if you close the terminal or shut down your computer you must install tmux while being connected to your EC2 instance.
To install tmux:
```bash
sudo yum install tmux -y
```
Launch tmux and give the session a name:
```bash
tmux new -s godotserver
```
Do the same command as before to launch the server:
```bash
./server/server.sh
```
You can now close the console or shut down your computer, and your server will still be running.
To disconnect your server, go back to your tmux session if you had left it by typing this:
```bash
tmux attach -t godotserver
```
Then press **Ctrl + C** to disconnect the server.
Reviews
Quick Information
Simple Online Multiplayer Networking Authoritative Dedicated Server
# Simple Online Multiplayer Networking Authoritative Dedicated ServerA simple Godot multiplayer setup. Change the IP address to your cloud service public DNS, then compile and upload it as a Linux headless version with debug. The clients will connect automatically to the server. The server has full authority; players can only send inputs in order to prevent cheating. The server is the only one able to see the players’ inputs. The server selects a random map, then selects a random node in the spawn area group, obtains its dimensions, and sets a random position for the client spawned inside it.## Tutorial to host the game online* Create an Amazon Web Services account, then sign in to the console. At the top right, set the region to where you want to create the server (ideally East United States or West Europe).* Create an EC2 instance. Create a key pair, name it for example **mykey**, and save it in a folder that you call **security**. Beside the checkbox **Allow SSH traffic from**, set the option to **My IP**. Click **Launch instance**.* Go to your instance. Click the **Security** tab. Open the **Security groups** link. Click **Edit inbound rules**. Click **Add rule**, set the type to **Custom UDP**, and for the port range use the port of your game (in this demonstration project it is 8080). For the source, select **Anywhere IPv4**. Click **Save rules**.* In your instance, copy the full Public DNS address to your game script for the constant `SERVER_IP`. Important: each time you stop the instance and then start it again the Public DNS will change, and you will need to rebuild your game.* Export a Linux build of your game. In the **Resources** tab, set the **Export mode** to **Export as dedicated server**. Export it and check **Export With Debug** in order to obtain a `.sh` file. This is the file the cloud server will run. Use a simple name such as **server** and save your project in a folder called **server**.Open the console. Go to the folder where you saved your key, for example (use right click to paste in the console):```bashcd "C:\Users\USERNAME\Desktop\security"```Then type this to connect to your instance:```bashssh -i mykey.pem ec2-user@PUBLIC_DNS_HERE```If it asks for the fingerprint, type **yes**. Then type it again to connect; you should see a bird displayed.Before uploading your server file, make sure that you have pasted the Public DNS of your instance for the SERVER_IP constant in your game. If you want to upload a new version, delete the previous folder in your instance first using this command: `rm -rf ~/server`. To upload the files, you must not be connected to the instance. Open a new console and type this, using the path to your key and the path to your server folder.```bashscp -i "C:\Users\USERNAME\Desktop\security\mykey.pem" -r "C:\Users\USERNAME\Desktop\server" ec2-user@PUBLIC_DNS_HERE:~/server```Go back to the previous console where you are connected or use the previous command to connect again:```bashssh -i mykey.pem ec2-user@PUBLIC_DNS_HERE```You can type **ls** to see whether the folder has been uploaded correctly.Set the correct permissions for the files:```bashchmod -R +x server```Launch the server with this command:```bash./server/server.sh```**Make it persistent**To make it persistent and make it always run even if you close the terminal or shut down your computer you must install tmux while being connected to your EC2 instance.To install tmux:```bashsudo yum install tmux -y```Launch tmux and give the session a name:```bashtmux new -s godotserver```Do the same command as before to launch the server:```bash./server/server.sh```You can now close the console or shut down your computer, and your server will still be running.To disconnect your server, go back to your tmux session if you had left it by typing this:```bashtmux attach -t godotserver```Then press **Ctrl + C** to disconnect the server.
Supported Engine Version
4.5
Version String
1.0
License Version
MIT
Support Level
community
Modified Date
19 hours ago
Git URL
Issue URL