Install Asset
Install via Godot
To maintain one source of truth, Godot Asset Library is just a mirror of the old asset library so you can download directly on Godot via the integrated asset library browser


Quick Information

Loads maps from Mapbox and renders it in 3D.The module tries to represent that data as accurate as possible and being as fast as possible, being this way ideal to load dynamically the terrain (imagine flight simulator that can load terrain from anywhere in the world as you go).TRY IT YOURSELFCreate a scene with directional light, a camera, etc. Then add a TerrainLoader node. And then in the node's properties set latitude, longitude and zoom level (It's the Cordinates setting, or Tilecoords if you want to enter directly the tile X/Y/Z). You can load multiple tiles by just changing the coordinates, usually, once entered the first Lat/Lon/Zoom you may want to just change the tile, so that you have contiguous tiles. The "Arrange Tiles" checkbox will enable automatic alignment of the tiles, based on their tile position.MAPBOXYou will need to open an account to Mapbox and paste the API key in the settings of the node.It is also required from Mapbox that you use their watermark, see the main scene example or look here: https://www.mapbox.com/help/how-attribution-works/FUTUREI am working on a totally new version of this add-on, but it is not ready yet.
GodotMapLoader
Loads maps from MapBox and renders it in 3D


This is still a work in progress, some features need improvement (and help is welcome).
The module tries to represent that data as accurate as possible and being as fast as possible, being this way ideal to load dynamically the terrain (imagine flight simulator that can load terrain from anywhere in the world as you go).
Try it yourself
Fisrt thing fisrt (after you downloaded the addon files in the "addon" folder, or added it from the Godot Asset Library) you have to activate the addon in the Project Settings page.

Create a scene with directional light, a camera, etc. Then add a TerrainLoader node. And then in the node's properties set latitude, longitude and zoom level (It's the Cordinates setting, or Tilecoords if you want to enter directly the tile X/Y/Z). You can load multiple tiles by just changing the coordinates, usually, once entered the first Lat/Lon/Zoom you may want to just change the tile, so that you have contiguous tiles. The "Arrange Tiles" checkbox will enable automatic alignment of the tiles, based on their tile position.
Some coordinate you can use to test the script
IGUAZU FALLS lat: -25.695277777778 lon: -54.436666666667
FLORENCE - lat: 43.771388888889 lon: 11.254166666667
COTOPAXI lat: -0.680556, lon: -78.437778
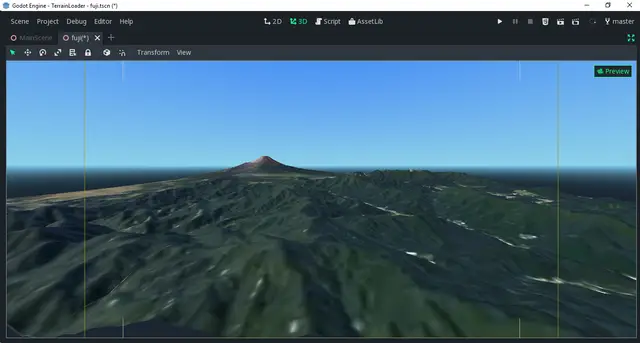
MOUNT FUJI lat: 35.36 lon: 138.73
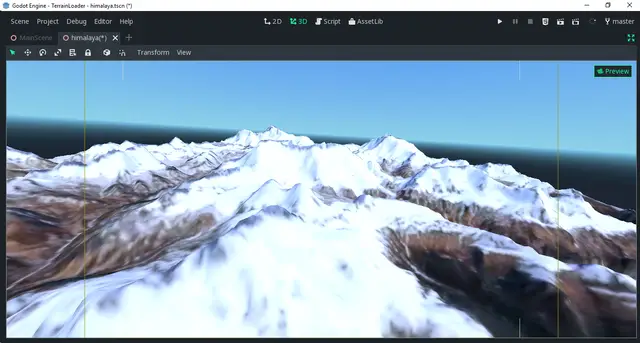
HIMALAYA lat: 27.988056, lon: 86.925278
Mapbox Attribution
As this mdule is using Mapbox services, you should follow the guidelines mentioned here: How attribution works, if you plan to use the maps publicly. You can see an example in the main scene.
TODOs
Mesh dimensions should adapt so that lower zoom levels will result in bigger meshes, a rudimental LOD system.
The earth curvature at low zoom levels (up to 6 but should be less probably), is not rendering correctly, there should be some precision error, or I am misunderstanding someting about tile/pixel to latitute conversion.
Mesh size is still too big (approx 25MB per tile generated), need some logic to skip unnecessary vertices (It's almos implemented, but needs a better logic).
Dinamically generated normal maps would come handy too, especially at low zooms (approx 1 to 4), as altitudes are irrelevant, but still at certain light inclinations it should project some sort of shadows.
Loads maps from Mapbox and renders it in 3D.
The module tries to represent that data as accurate as possible and being as fast as possible, being this way ideal to load dynamically the terrain (imagine flight simulator that can load terrain from anywhere in the world as you go).
TRY IT YOURSELF
Create a scene with directional light, a camera, etc. Then add a TerrainLoader node. And then in the node's properties set latitude, longitude and zoom level (It's the Cordinates setting, or Tilecoords if you want to enter directly the tile X/Y/Z). You can load multiple tiles by just changing the coordinates, usually, once entered the first Lat/Lon/Zoom you may want to just change the tile, so that you have contiguous tiles. The "Arrange Tiles" checkbox will enable automatic alignment of the tiles, based on their tile position.
MAPBOX
You will need to open an account to Mapbox and paste the API key in the settings of the node.
It is also required from Mapbox that you use their watermark, see the main scene example or look here: https://www.mapbox.com/help/how-attribution-works/
FUTURE
I am working on a totally new version of this add-on, but it is not ready yet.
Reviews
Quick Information

Loads maps from Mapbox and renders it in 3D.The module tries to represent that data as accurate as possible and being as fast as possible, being this way ideal to load dynamically the terrain (imagine flight simulator that can load terrain from anywhere in the world as you go).TRY IT YOURSELFCreate a scene with directional light, a camera, etc. Then add a TerrainLoader node. And then in the node's properties set latitude, longitude and zoom level (It's the Cordinates setting, or Tilecoords if you want to enter directly the tile X/Y/Z). You can load multiple tiles by just changing the coordinates, usually, once entered the first Lat/Lon/Zoom you may want to just change the tile, so that you have contiguous tiles. The "Arrange Tiles" checkbox will enable automatic alignment of the tiles, based on their tile position.MAPBOXYou will need to open an account to Mapbox and paste the API key in the settings of the node.It is also required from Mapbox that you use their watermark, see the main scene example or look here: https://www.mapbox.com/help/how-attribution-works/FUTUREI am working on a totally new version of this add-on, but it is not ready yet.
