Install Asset
Install via Godot
To maintain one source of truth, Godot Asset Library is just a mirror of the old asset library so you can download directly on Godot via the integrated asset library browser

Quick Information

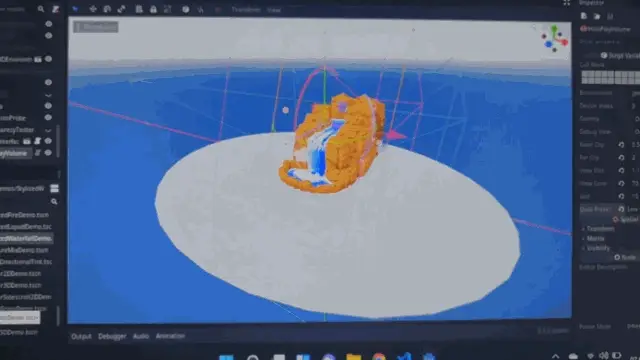
This plugin adds suport for holographics displays made by Looking Glass Factory to the Godot Engine.Just drop the new HoloPlayVolume spatial node into the scene and view your Godot project as a hologram!**Windows only at the moment.**
HoloPlay for Godot 3.3
This plugin adds suport for holographics displays made by Looking Glass Factory to the Godot Engine.

The GDNative source is hosted here and a minimal demo project is hosted here.
Table of contents
- Installation
- Instructions
- HoloPlayVolume Node
- HoloPlayRecorder Node
- Known issues and workarounds
- GDNative library source
- License
Installation
The plugin can be installed from the Godot Asset Library directly in the editor. Alternatively, you can also directly clone/download this repository and add it to the root of your Godot project.
⚠️ Note that the plugin is currently only available for Windows.
Instructions
Setting up the Looking Glass
Just follow the instructions in the official getting started guide to set up your Looking Glass.
Adding a Looking Glass to your scene
To add a holographic Looking Glass display to your scene, use the new Spatial node HoloPlayVolume. After you have dropped it into your scene, all parts of the scene that are within the displayed bounding box will be displayed on the Looking Glass. The node has editable properties that can be used to adjust how the holographic content will be displayed and can be moved and rotated freely within the scene and also works in the editor.
⚠️ Please enable the HiDPI setting (display/window/dpi/allow_hidpi) in the project settings, otherwise things will break when the display scale is not set to 100 % (see issue #2).
Mouse input
The Looking Glass runs in a separate window from Godot's main window. In order to capture the mouse cursor position in this window, use grab_mouse. Use get_mouse_position to retrieve the current position of the cursor on the hoographic display. (You can still listen to InputEventMouseMotion events but they will contain incorrect positions so please use get_mouse_position.)
Recording holograms
Using HoloPlayRecorder
You can use the HoloPlayRecorder node to record holograms as movies or stills. In order to do so, add a HoloPlayRecorder node as a child to an existing HoloPlayVolume node. Recording is possible directly in the editor, using the autorecording feature or programmatically from your game code.
To capture holograms inside the editor, select the HoloPlayRecorder node and check either the recording or the take_snapshot property in the inspector. The former will try to save movie frames at the framerate specifiec in target_fps until recording is unchecked again, the latter will save a single frame (it is intended behaviour that the take_snapshot property cannot be actually checked).
The property autorecording_enabled enables the autorecording feature. When runnig the scene (either exported or from the editor) containing the HoloPlayRecorder, a hologram recording will automatically be started after autorecording_start seconds and stopped after an additional autorecording_duration seconds. If autorecording_quit_when_done is checked, the game will automatically quit after the recording has finished processing (this may take longer than the actual recording as frames are queued and saved to disk in a separate thread).
Recordings can also be started programmatically by setting the recording property to true or false or calling the take_snapshot() method for a single capture.
⚠️ As processing all frames may take longer than recording them, you should not close the game until the finished signal has been emitted by the HoloPlayRecorder when recording movies.
Movies as well as single captures will be saved to the user:// directory which, on Windows, is located at %appdata%\Godot\app_userdata\<your-project-name>. Movies are stored as a series of PNG files and you will need a tool such as FFmpeg to convert them to video files.
Using get_quilt_tex() and a screen capture software
This method of recording holograms requires some setup but allows you to use an external screen capture software such as OBS to capture your holograms, for potentially smoother results.
It has the drawback of limiting output resolution to your monitor resolution and blocking the main game window.
- Add a
TextureRectnode as a child of the theHoloPlayVolumeyou want to capture and set its right and bottom anchors to1.0so that it fills the game window. - Add a script to the
TextureRectand add the following code (depending):
func _ready():
    texture = get_parent().get_quilt_tex()
- In the project settings, set the windows size to the same width and height. The higher the resolution, the better the capture will be.
- Run the game and use your capture software to capture the game window.
HoloPlayVolume Node
The plugin adds a new spatial node, HoloPlayVolume to Godot. This node represents a Looking Glass inside the scene. It consists of a focus plane, a near plane and a far plane as well as a size that represent the bounds of the holographic content. View distance and view cone can be adjusted for optimal viewing of the hologram. Below is a list of all properties:
Property Descriptions
- int cull_mask
| Default | 16777215 |
| Setter | set_cull_mask(value) |
| Getter | get_cull_mask() |
The culling mask that describes which 3D render layers are rendered for the hologram.
- Environment environment
| Setter | set_environment(value) |
| Getter | get_environment() |
The Environment to use for the hologram.
- float near_clip
| Default | 0.2 |
| Setter | set_near_clip(value) |
| Getter | get_near_clip() |
Distance between the focus and near planes. Scales with size. Content in front of the plane will be clipped. Allows content to "pop-out" from the hologramm but elements that stick out too much might appear jarring.
- float far_clip
| Default | 0.5 |
| Setter | set_far_clip(value) |
| Getter | get_far_clip() |
Distance between the focus and the far planes. Scales with size. High values are usually less of a problem here.
- float size
| Default | 1.0 |
| Setter | set_size(value) |
| Getter | get_size() |
Size of the holographic volume in the scene. Use this instead of scale. The near and far planes will scale with this.
- float view_dist
| Default | 1.0 |
| Setter | set_view_dist(value) |
| Getter | get_view_dist() |
The distance between the viewer and the focal plane in world units. Does not scale with size. Adjust this to a value where the hologram is pleasant to view.
- float view_cone
| Default | 80 |
| Setter | set_view_cone(value) |
| Getter | get_view_cone() |
Cone (in degrees) inside which the hologram can be viewed. The default value usually works good for the Looking Glass Portrait.
- int quilt_preset
| Default | MEDIUM_QUALITY |
| Setter | set_quilt_preset(value) |
| Getter | get_quilt_preset() |
Quality preset of the rendered quilt (which is used to display content on the Looking Glass). There are three settings available:
Low quality (value
0): Render 21 viewing angles at 1024x1024 px.Medium Quality (value
1): Render 32 viewing angles at 2048x2048 px.High Quality (value
2): Render 45 viewing angles at 4096x4096 px.Very High Quality (value
3): Render 45 viewing angles at 8192x8192 px.int device_index
| Default | 0 |
| Setter | set_device_index(value) |
| Getter | get_device_index() |
Device index of the Looking Glass. Usually 0 for a single connected Looking Glass.
Method Descriptions
- ViewportTexture get_quilt_tex() const
Returns the ViewportTexture containing the rendered quilt. Useful for e.g. recording your holograms using OBS.
- float get_aspect() const
Returns the aspect ratio of the Looking Glass (screen width divided by screen height).
- Rect2 get_rect() const
Returns a Rect2 containing the position and size of the attached window.
- void grab_mouse()
"Grabs" the mouse so that all subsequent InputEventMouseMotion events will update the position of the mouse cursor in the attached window.
Only one HoloPlayVolume that last called grab_mouse() will update the position.
Note: Internally, sets the mouse mode to MOUSE_MODE_CAPTURED. To query the position of the mouse cursor in the window you must use get_mouse_position() (relative mouse motion can still be queried from InputEventMouseButton events).
- void release_mouse()
Return the mouse mode to what it was originally before calling grab_mouse() and do not update the mouse cursor position in the window any longer.
- Vector2 get_mouse_position() const
Returns the mouse position in the attached. The top left corner of the window Vector2(0, 0).
Note: Will only be updated while the mouse has been grabbed using grab_mouse.
The following methods work similar to their counterparts of the Camera node.
- Vector3 project_position(Vector2 screen_point, float z_depth) const
Maps a 2D position in the attached window to a 3D position in world space on a plane z_depth distance away from the focus plane. Use negative values to move towards the near plane.
Can be used to retrieve a cursor position in world space from the position returned get_mouse_position().
- Vector3 project_ray_origin(Vector2 screen_point) const
Maps a 2D position in the attached window to a starting point for ray casts into the volume. Use together with project_ray_normal().
- Vector3 project_ray_normal(Vector2 screen_point) const
Maps a 2D position in the attached window to a normalized direction vector for ray casts into the volume. Use together with project_ray_origin().
HoloPlayRecorder Node
The HoloPlayRecorder node allows you to record hologram movies and stills as a series of PNGs. See Recording holograms for more details.
Signals
- finished
Emitted when all started recordings have finished processing, that is the recording has finished and all frames have been saved to disk. You should always check that this signal has been emitted before closing the game.
Property Descriptions
- bool recording
| Default | false |
| Setter | set_recording(value) |
| Getter | get_recording() |
Setting this property starts and stops recording a movie. The movie will be saved as a series of PNGs in the user:// directory.
- int target_fps
| Default | 25 |
| Setter | set_target_fps(value) |
| Getter | get_target_fps() |
Sets the target FPS for movie recordings.
The remaining properties are left out since they should only be used from the inspector in the editor.
Method Descriptions
- void take_snapshot()
Saves the current quilt as a PNG file to the user:// directory.
Known issues and workarounds
Issue #2: Content not correctly positioned on the display when display scaling is not 100 %.
Workaround: Enable HiDPI support in the project settings (display/window/dpi/allow_hidpi).
GDNative library source
The source of the libgdholoplay.dll GDNative library can be found at https://github.com/CaptainProton42/GodotHoloPlayNative.
License
This plugin is available under the MIT license.
HoloPlayCore.dll is part of the HoloPlay Core SDK which is distributed by Looking Glass Factory under a separate license.
This plugin adds suport for holographics displays made by Looking Glass Factory to the Godot Engine.
Just drop the new HoloPlayVolume spatial node into the scene and view your Godot project as a hologram!
**Windows only at the moment.**
Reviews
Quick Information

This plugin adds suport for holographics displays made by Looking Glass Factory to the Godot Engine.Just drop the new HoloPlayVolume spatial node into the scene and view your Godot project as a hologram!**Windows only at the moment.**

