Pawn is an extendable library for native nodes, such as RigidBody and CharacterBody. It aims to simplify how to lead with speed/velocity and make it easy to set up a Player or an Enemy. Inspired by Unreal Pawn achicheture
Interact with WebAssembly modules from Godot.Inspect Wasm modules, access globals, call functions, and manipulate memory.Documentation: https://github.com/ashtonmeuser/godot-wasm/wikiRepository: https://github.com/ashtonmeuser/godot-wasm
Controllers are an Unreal Base node to the PlayerController, which allows users to quickly and simply connect Actions (From Input Manager) to Node Signals, all based on declarative and quick-to-configure Scene Nodes.
This plugin allow a fast and easyer way to comunicate with the Joystick service using Godot engine. With the addition of the "JoystickClient" Node you can easily get all the JSON data inside all your configurations.See about joystick in:https://www.getjoystick.com
Godot RL Agents is a fully open source package that allows video game creators, AI researchers and hobbyists the opportunity to learn complex behaviors for their Non Player Characters or agents.Find out more at the libraries github repo: https://github.com/edbeeching/godot_rl_agents
Compatible with Godot 4.1-stable and later version!## Features- Format with **shortcut** - Defaults to **Shift+Alt+F**- Format on save - Off by default, can be enabled by [editing the preferences in EditorSettings](#editing-preferences)- Format through **tool menu** - **Project -> Tool -> GDScript Formatter: Format script**- Format through **command palette** - Open the command palette (Default **Ctrl+Shift+P**) and run command `Format GDScript`## Installation**GDScript Formatter** relies on [**GDToolkit**](https://github.com/Scony/godot-gdscript-toolkit) which uses Python and Pip package manager. You need to install them in order to use the addon.1. Install Python (if you do not have it already) - Download installer from [https://www.python.org/downloads/] - Make sure to enable "Add python.exe to PATH" when installing - If you forget you can [add python.exe to PATH after installation](https://realpython.com/add-python-to-path/) - Pip is included with python2. Install the Godot plugin - In Godot editor, click "AssetLib" and search "GDScript Formatter" - Install the plugin - Enable the plugin through **Project -> Project Settings -> Plugins**3. Install GDToolkit - **Project -> Tool -> GDScript Formatter: Install/Update gdtoolkit** **Note: if your python is not install for all users, you might need to change the command by [editing the preference](# Editing Preferences)**## Editing PreferencesYou can edit GDScript Formatter's behavior through the **Editor -> Editor Settings -> General -> GDScript Formatter**. You can change whether files are formatted on save, the gdformat command, line length, shortcut, and other values.If you need to change preference for specific project, you can check `GDScript_Formatter/custom_settings_enabled` and modify settings in **Project -> Project Settings -> General -> GDScript Formatter**.## OthersIf this plugin can help you, please consider to [buy me a coffee](https://afdian.com/a/Daylily-Zeleen), I would try my best to release more plugins and maintain old plugins.-----------------------------------------------一个用于格式化GDSCript脚本的Godot4.x插件。## 特性- 使用**快捷键**进行脚本格式化 - 默认快捷键为**Shift+Alt+F**- 保存脚本时自动格式化 - 默认关闭,通过在编辑器设置中[编辑偏好设置](#偏好设置)进行开启。- 通过**工具菜单**进行格式化 - **项目 -> 工具 -> GDScript Formatter: Format script**- 通过**命令面板**进行格式化 - 打开命令面板(默认快捷键为**Ctrl+Shift+P**)并运行命令`Format GDScript`。## 安装**GDScript Formatter**依赖于[**GDToolkit**](https://github.com/Scony/godot-gdscript-toolkit)。如果你没有自行安装**GDToolKit**,可使用本插件**安装/更新GDToolkit**的功能,这需要你先自行安装**Pip**(通过安装**Python**获得),具体步骤如下:1. 安装Python(如果你没有安装的话) - 从 [https://www.python.org/downloads/] 下载Python安装包。 - 确保在安装时开启了"**Add python.exe to PATH**"选项 - 如果你忘记开启该选项,亦可[在安装之后将"python.exe"添加到PATH中](https://realpython.com/add-python-to-path/) - **Pip**将被包含在**Python**中。2. 在你的Godot项目中安装"**GDScript Formatter**"插件 - 在Godot编辑器中,点击"AssetLib"并搜索"GDScript Formatter" - 安装该插件 - 通过**项目 -> 项目设置 -> 插件**开启"GDScript Formatter"3. 安装GDToolkit - **项目 -> 工具 -> GDScript Formatter: Install/Update gdtoolkit** **注意:如果你的Python仅为部分部分用户安装,可能需要前往编辑器设置来调整[偏好设置](#偏好设置)中的命令。**## 偏好设置你可以通过编辑编辑器设置来修改**GDScript Formatter**的行为(**编辑器 -> 编辑器设置 -> 通用 -> GDScript Formatter**)。其中包括格式化时每行的最大长度,是否开启保存时自动格式化,快捷键,实际使用的pip命令,实际使用的gdformat命令等。如果你需要为特定项目设置不同的偏好设置,可以在项目设置中(**项目 -> 项目设置 -> 通用 -> GDScript Formatter**)勾选上`GDScript_Formatter/custom_settings_enabled`并调整其他设置。## 其他如果这个插件能帮到你还请为我[充电](https://afdian.com/a/Daylily-Zeleen),我也会尽力推出新的插件和维护老的插件。一个用于格式化GDSCript脚本的Godot4.x插件。## 特性- 使用**快捷键**进行脚本格式化 - 默认快捷键为**Shift+Alt+F**- 保存脚本时自动格式化 - 默认关闭,通过在编辑器设置中[编辑偏好设置](#偏好设置)进行开启。- 通过**工具菜单**进行格式化 - **项目 -> 工具 -> GDScript Formatter: Format script**- 通过**命令面板**进行格式化 - 打开命令面板(默认快捷键为**Ctrl+Shift+P**)并运行命令`Format GDScript`。## 安装**GDScript Formatter**依赖于[**GDToolkit**](https://github.com/Scony/godot-gdscript-toolkit)。如果你没有自行安装**GDToolKit**,可使用本插件**安装/更新GDToolkit**的功能,这需要你先自行安装**Pip**(通过安装**Python**获得),具体步骤如下:1. 安装Python(如果你没有安装的话) - 从 [https://www.python.org/downloads/] 下载Python安装包。 - 确保在安装时开启了"**Add python.exe to PATH**"选项 - 如果你忘记开启该选项,亦可[在安装之后将"python.exe"添加到PATH中](https://realpython.com/add-python-to-path/) - **Pip**将被包含在**Python**中。2. 在你的Godot项目中安装"**GDScript Formatter**"插件 - 在Godot编辑器中,点击"AssetLib"并搜索"GDScript Formatter" - 安装该插件 - 通过**项目 -> 项目设置 -> 插件**开启"GDScript Formatter"3. 安装GDToolkit - **项目 -> 工具 -> GDScript Formatter: Install/Update gdtoolkit** **注意:如果你的Python仅为部分部分用户安装,可能需要前往编辑器设置来调整[偏好设置](#偏好设置)中的命令。**## 偏好设置你可以通过编辑编辑器设置来修改**GDScript Formatter**的行为(**编辑器 -> 编辑器设置 -> 通用 -> GDScript Formatter**)。其中包括格式化时每行的最大长度,是否开启保存时自动格式化,快捷键,实际使用的pip命令,实际使用的gdformat命令等。如果你需要为特定项目设置不同的偏好设置,可以在项目设置中(**项目 -> 项目设置 -> 通用 -> GDScript Formatter**)勾选上`GDScript_Formatter/custom_settings_enabled`并调整其他设置。## 其他如果这个插件能帮到你还请为我[充电](https://afdian.com/a/Daylily-Zeleen),我也会尽力推出新的插件和维护老的插件。
Steamworks API plug-in for Godot Engine. Available for the Windows 32/64-bit, Linux 32/64-bit platforms, and Mac universal. It is based on GodotSteam 4.15 with Steamworks SDK 1.62.This version is meant for Godot Engine 4.1 to 4.3 but should also work in 4.4; other versions include:Godot 4.4: https://godotengine.org/asset-library/asset/2445 Godot 4.0: https://godotengine.org/asset-library/asset/1768Previous versions of the plug-in can also be found at the GodotSteam repository: https://codeberg.org/godotsteam/godotsteam/releases.You can find the full documentation with tutorials at https://godotsteam.com.It does not require enabling but you may need to restart your editor.
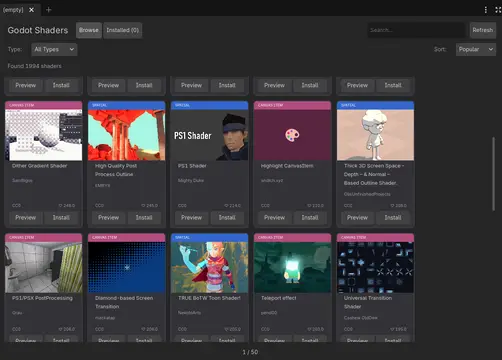
Browse and install 2000+ shaders from godotshaders.com directly in Godot Editor. Features include search, filtering by type (Spatial, Canvas Item, Particles, Sky, Fog), shader preview with code, one-click install, 24-hour caching with daily auto-updates, and support for 9 languages.
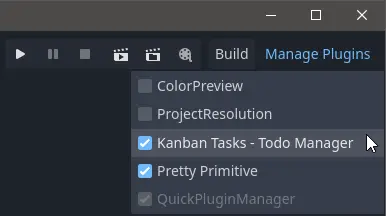
Updated to work with Godot 4.x version.forked from original Godot 3.x version https://github.com/mastermarkus/QuickPluginManagerFaster plugin management without going deep into Godot's plugin settingsThe button appear in upper-right corner (when you activate the plugin)There you can select plugin(s) to enable/disable
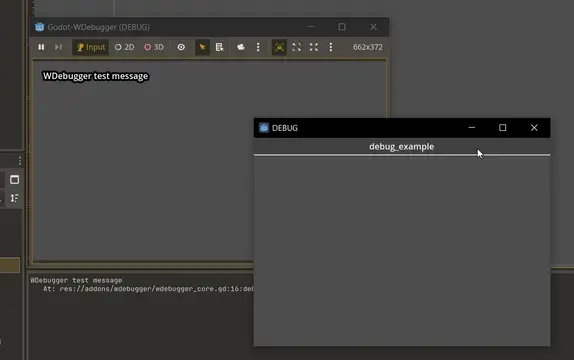
# WDebugger: A Git-friendly DebuggerMost (if not all) of the debugging plugins have two major flaws that I always disliked:1. They are not git-friendly. You can't ignore the debugging functions, therefore they're committed to the git history. This causes: - Bloat in your git history - Unwanted changes to files when you just want to change a debugging function - Conflicts when working in a team - which is probably the most important issue2. They take too much space on the game, which interfers with the testing; Whether be a debugging console that pops up, or just normal GUI buttons you have defined.To Address and fix these issues, I made this plugin. It solves the first issue by separating the debugging functions in a specific file (which you can put in `.gitignore` afterwards); And solves the second problem by introducing a Window node that is separate from the main window.If you enjoyed the plugin, please give it a star on Github: https://github.com/zmn-hamid/Godot-WDebugger## How To TestJust enable the plugin in the settings and run your game. If you're happy with the plugin, you can continue to the next section:## How To Use1. Define your debug functions inside `addons/wdebugger/wdebugger_core.gd` with the given instruction inside that file.2. Open `.gitignore` file in your root directory and write the path to the core file inside of it:`addons/wdebugger/wdebugger_core.gd`3. Enable the plugin and enjoy!## How To Move The Core File1. Cut/Copy the core file and paste it anywhere you want2. Define this new path inside `.gitignore` and `addons/wdebugger/wdebugger.gd` -> `wdebugger_core_path` variable.## ContributionEven though this is a fully functional plugin, any reasonable and beneficial contributionis highly appreciated. Feel free to make your changes and make a pull request or to just simply open an issue Please visit the project on github for more info: https://github.com/zmn-hamid/Godot-WDebugger# LicenseThis project is licensed under the GNU General Public License (GPL) v3. See `LICENSE` for full terms.
Key features:- any Object can be a component- discrete mode to process systems step by step- readonly components- handy entity filtering outside System class- nodes binding with entity - well documented scripts, just press f1 and search what you needSee github for an addon review: https://github.com/Germenzi/gdECSv4
Godot State Charts is an extension for Godot Engine 4 or later that allows you to use state charts in your game. State Charts are similar to finite state machines, but they are more powerful and avoid the state explosion problem of traditional FSMs. To get started, check out the manual at: https://github.com/derkork/godot-statecharts/blob/main/manual/manual.md